iOS App

iOS App For Myself.

Maker’s Schedule,Manager’s Schedule

Maker’s Scheudle ,Manager’s Schedule

One reason programmers dislike meetings so much is that they’re on a different type of schedule from other people. Meetings cost them more.

There are two types of schedule, which I’ll call the manager’s schedule and the maker’s schedule. The manager’s schedule is for bosses. It’s embodied in the traditional appointment book, with each day cut into one hour intervals. You can block off several hours for a single task if you need to, but by default you change what you’re doing every hour.

When you use time that way, it’s merely a practical problem to meet with someone. Find an open slot in your schedule, book them, and you’re done.

Most powerful people are on the manager’s schedule. It’s the schedule of command. But there’s another way of using time that’s common among people who make things, like programmers and writers. They generally prefer to use time in units of half a day at least. You can’t write or program well in units of an hour. That’s barely enough time to get started.

When you’re operating on the maker’s schedule, meetings are a disaster. A single meeting can blow a whole afternoon, by breaking it into two pieces each too small to do anything hard in. Plus you have to remember to go to the meeting. That’s no problem for someone on the manager’s schedule. There’s always something coming on the next hour; the only question is what. But when someone on the maker’s schedule has a meeting, they have to think about it.

For someone on the maker’s schedule, having a meeting is like throwing an exception. It doesn’t merely cause you to switch from one task to another; it changes the mode in which you work.

I find one meeting can sometimes affect a whole day. A meeting commonly blows at least half a day, by breaking up a morning or afternoon. But in addition there’s sometimes a cascading effect. If I know the afternoon is going to be broken up, I’m slightly less likely to start something ambitious in the morning. I know this may sound oversensitive, but if you’re a maker, think of your own case. Don’t your spirits rise at the thought of having an entire day free to work, with no appointments at all? Well, that means your spirits are correspondingly depressed when you don’t. And ambitious projects are by definition close to the limits of your capacity. A small decrease in morale is enough to kill them off.

Each type of schedule works fine by itself. Problems arise when they meet. Since most powerful people operate on the manager’s schedule, they’re in a position to make everyone resonate at their frequency if they want to. But the smarter ones restrain themselves, if they know that some of the people working for them need long chunks of time to work in.

Our case is an unusual one. Nearly all investors, including all VCs I know, operate on the manager’s schedule. But Y Combinator runs on the maker’s schedule. Rtm and Trevor and I do because we always have, and Jessica does too, mostly, because she’s gotten into sync with us.

I wouldn’t be surprised if there start to be more companies like us. I suspect founders may increasingly be able to resist, or at least postpone, turning into managers, just as a few decades ago they started to be able to resist switching from jeans to suits.

How do we manage to advise so many startups on the maker’s schedule? By using the classic device for simulating the manager’s schedule within the maker’s: office hours. Several times a week I set aside a chunk of time to meet founders we’ve funded. These chunks of time are at the end of my working day, and I wrote a signup program that ensures all the appointments within a given set of office hours are clustered at the end. Because they come at the end of my day these meetings are never an interruption. (Unless their working day ends at the same time as mine, the meeting presumably interrupts theirs, but since they made the appointment it must be worth it to them.) During busy periods, office hours sometimes get long enough that they compress the day, but they never interrupt it.

When we were working on our own startup, back in the 90s, I evolved another trick for partitioning the day. I used to program from dinner till about 3 am every day, because at night no one could interrupt me. Then I’d sleep till about 11 am, and come in and work until dinner on what I called “business stuff.” I never thought of it in these terms, but in effect I had two workdays each day, one on the manager’s schedule and one on the maker’s.

When you’re operating on the manager’s schedule you can do something you’d never want to do on the maker’s: you can have speculative meetings. You can meet someone just to get to know one another. If you have an empty slot in your schedule, why not? Maybe it will turn out you can help one another in some way.

Business people in Silicon Valley (and the whole world, for that matter) have speculative meetings all the time. They’re effectively free if you’re on the manager’s schedule. They’re so common that there’s distinctive language for proposing them: saying that you want to “grab coffee,” for example.

Speculative meetings are terribly costly if you’re on the maker’s schedule, though. Which puts us in something of a bind. Everyone assumes that, like other investors, we run on the manager’s schedule. So they introduce us to someone they think we ought to meet, or send us an email proposing we grab coffee. At this point we have two options, neither of them good: we can meet with them, and lose half a day’s work; or we can try to avoid meeting them, and probably offend them.

Till recently we weren’t clear in our own minds about the source of the problem. We just took it for granted that we had to either blow our schedules or offend people. But now that I’ve realized what’s going on, perhaps there’s a third option: to write something explaining the two types of schedule. Maybe eventually, if the conflict between the manager’s schedule and the maker’s schedule starts to be more widely understood, it will become less of a problem.

Those of us on the maker’s schedule are willing to compromise. We know we have to have some number of meetings. All we ask from those on the manager’s schedule is that they understand the cost.
Objective-C类结构- 类与元类

一. 对象(Instance)

Objective-C中的每个对象都是某类(Class)的实例(instance),对象数据结构中的isa字段即指向此类。 如objc_object结构所示。

typedef struct objc_object {
    Class isa;
} *id;

类描述了对象的数据与行为,数据包括分配空间的大小,实例变量类型以及布局等,行为包括了对象可响应的selectors和方法实现(IMP)。

类中的方法列表为对象可响应的的实例方法集,当向一个实例对象(instance)发送消息时,objc_msgSend会通过对象的isa指针定位到类,在类(以及super_class指向的父类)的方法列表中寻找可响应此消息的方法实现(IMP)。

二. 类(Class)

类本身也是一种对象,那么类也有isa指针和其他一些数据,也能响应selectors。当调用类方法(如[[NSObject alloc]])时,实际上就是向类对象发送消息。

既然类也是一种对象,那么它一定也是另外一些类的实例,类对象的类称为元类(metaclass),元类是类对象的描述,就是类是普通实例对象的描述一样。元类中的方法类别实际就是类方法,当向一个类发送消息时,objc_msgSend会通过类对象的isa指针定位到元类,在元类(以及super_class指向的父类)的方法列表中寻找可响应此消息的方法实现(IMP)。

元类中描述了类可响应的方法,就像类中描述了实例对象可响应的方法一样。

类对象的结构在不同版本的runtime中有不同的实现,但基本结构都是如下所示,首字段为isa指针指向元类,super_class指向其父类。

typedef struct objc_class *Class;
struct objc_class {
    Class isa;
    Class super_class;
    /* followed by runtime specific details... */
};

三.元类(metaclass)

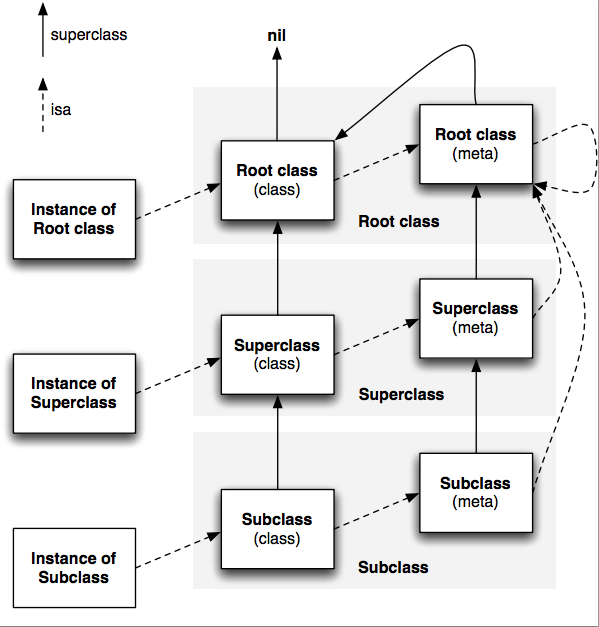
那么元类也是对象,应该也为其他类的实例,实际上元类是根元类(root class’s metaclass)的实例,而根元类是其自身的实例,即根元类的isa指针指向自身。

类的super_class指向其父类,而元类的super_class则指向父类的元类。元类的super class链与类的super class链平行,所以类方法的继承与实例方法的继承也是并行的。而根元类(root class’s metaclass)的super_class指向根类(root class),所以和其他实例对象一样,类对象也都是根类(或其子类)的实例。

对象,类,元类之间的关系如图所示:

四.相关函数和方法

  • object_getClass跟随实例的isa指针,返回此实例所属的类,对于实例对象(instance)返回的是类(class),对于类(class)则返回的是元类(metaclass),

  • class方法对于实例对象(instance)会返回类(class),但对于类(class)则不会返回元类(metaclass),而只会返回类本身,即[@“instance” class]返回的是__NSCFConstantString,而[NSString class]返回的是NSString。

  • class_isMetaClass可判断某类是否为元类.

  • 使用objc_allocateClassPair可在运行时创建新的类与元类对,使用class_addMethodclass_addIvar可向类中增加方法和实例变量,最后使用objc_registerClassPair注册后,就可以使用此类了。

五.演示例子

首先创建一个NSError的子类

Class newClass = objc_allocateClassPair([NSError class], "RuntimeErrorSubclass", 0); 
class_addMethod(newClass, @selector(report), (IMP)ReportFunction, "v@:"); 
objc_registerClassPair(newClass);

向新创建的类中添加了一个report方法,其IMP为ReportFunction函数,如下

void ReportFunction(id self, SEL _cmd) { 
    NSLog(@"This object is %p.", self); 
    NSLog(@"Class is %@, and super is %@.", [self class], [self superclass]); 
    Class currentClass = [self class]; 
    for (int i = 1; i < 5; i++) { 
        NSLog(@"Following the isa pointer %d times gives %p", i, currentClass); 
        currentClass = object_getClass(currentClass); 
    } 
    NSLog(@"NSObject's class is %p", [NSObject class]); 
    NSLog(@"NSObject's meta class is %p", object_getClass([NSObject class])); 
}

在ReportFunction函数中打印了对象自身的地址,对象的类以及父类,以及跟随isa指针向上的类地址。 然后创建一个此类的实例,并调用其report方法

id instanceOfNewClass = [[newClass alloc] initWithDomain:@"someDomain" code:0 userInfo:nil]; 
[instanceOfNewClass performSelector:@selector(report)]; 

输出结果为:

This object is 0x87957c0. 
Class is RuntimeErrorSubclass, and super is NSError. 
Following the isa pointer 1 times gives 0x87412c0 
Following the isa pointer 2 times gives 0x8796020 
Following the isa pointer 3 times gives 0x2900f60 
Following the isa pointer 4 times gives 0x2900f60 
NSObject's class is 0x2900f4c 
NSObject's meta class is 0x2900f60

查看输出地址可得:

  • 对象的地址是0x87957c0
  • 类的地址是0x87412c0
  • 元类的地址是0x8796020
  • 元类的类地址为0x2900f60,即NSObject的元类
  • NSObject的元类的类地址仍为0x2900f60,即为自身。

参考:

使用Reveal分析第三方App

一.手机越狱

  1. 使用越狱工具,如盘古将手机越狱
  2. 安装Cydia Substrate,OpenSSH,AppSync等工具

二.下载Reveal

可在官网下载试用版或者直接购买.

三.拷贝相关内容到越狱手机

保证电脑和手机在同一Wifi下,查看手机IP,检查能够使用ssh进行连接.具体可见手机上Cybia应用中的OpenSSH访问教程.

 $ ssh root@10.232.136.144
 The authenticity of host '10.232.136.144 (10.232.136.144)' can't be established.
RSA key fingerprint is 37:3f:9a:32:73:42:f8:49:8e:eb:e8:63:c3:0b:09:d1.
Are you sure you want to continue connecting (yes/no)? yes
Warning: Permanently added '10.232.136.144' (RSA) to the list of known hosts.
root@10.232.136.144's password: 
xuguoxingmato-iPhone:~ root# 

默认密码为”alpine”,进入系统后可用passwd命令修改密码。

在本机Reveal应用中找到Reveal.framework,libReveal.dylib文件,可通过Reveal的Help->Show Reveal Library in Finder菜单定位到。

通过scp命令将这两个文件拷贝到越狱手机中,在本机命令行执行以下命令

$ scp -r /Applications/Reveal.app/Contents/SharedSupport/iOS-Libraries/Reveal.framework root@x.x.x.x:/System/Library/Frameworks
$ scp /Applications/Reveal.app/Contents/SharedSupport/iOS-Libraries/libReveal.dylib root@x.x.x.x:/Library/MobileSubstrate/DynamicLibraries

在本地创建libReveal.plist文件,将需要分析App的BundleID加入其中,比如需要分享微信和短信应用;

{
    Filter = {
         Bundles = (
         "com.apple.MobileSMS",
         "com.tencent.xin");
    };
}

可双击用Xcode打开此文件,检查语法是否正确;

将此文件拷贝到手机中,在本机执行命令

$ scp libReveal.plist root@x.x.x.x:/Library/MobileSubstrate/DynamicLibraries 

也可以在手机命令上使用编辑工具,如nano直接进行编辑。

重启SpringBoard,在手机命令行执行

$ killall SpringBoard

四.使用Reveal分析

手机SpringBoard重启后,打开微信应用,在本机上打开Reveal,就可以看到连接并进行分析了。

注:若无法连接,则需要检查wifi的防火墙设置,Reveal使用苹果的Bonjour服务进行通信,有可能网络防火墙将此服务屏蔽了。

iPhone & iPad App Marketing Checklist

https://sensortower.com/iphone-app-marketing

  1. Icon and Icon and Screenshots

    Visuals that show off your App are vital for success

    • Design a good meaningful icon

      Great Icons dive up conversion

      Having a great icon that explain the app’s functionality can greatly increase App downloads. Icons that are too abstract or company logos do not perform as well. Here are some good best practices when designing icons.

    • Test App icon for conversion

      A Well converting icon greatly increase downloads.

      Having an interesting and pretty icon is great,but one that converts really well is even better. Try running some A/B Tests on your icon via banners or within other apps to measure conversion.

    • Select good first screenshot

      Most users decide based on the first screenshot.

      The first thing every user sees when looking at your app is the icon and the screenshot. The initial screenshot is essential to convince users that your app delivers on the functinality they are looking for. Learn how to design a great first screenshot for your app.

    • separate screenshots for different devices.

      Optimizing for multiple device is essencial.

      While there are more iPhones then iPads, supporting all the different devices is still important. Having an iPad specific version can do wonders for app exposure. iOS8 is also right around the corner. Learn about supporting iOS8 and universal apps.

    • Use all five screenshot slot

      Show the user the depth of the App

      You get five screenshots to show off your app — use all of them! Make sure your screenshots convery your app’s strengths and are enticing for the users.There are great articles about apps with great screenshots, or you can learn from top ranking apps that do this well.

  2. Conversion

    Your need to be able to convince users to install the app.

    • Write a good description

      Descriptions convince users to install.

      Users that aren’t convinced to install right away will read your description to make up their mind. Focus on the first few lines that are visible on the phone and don’t be afraid to test similar to how book authors use Google Adwords. A well converting description make your other effort easier.

    • Create an app Website

      You need one to support users, so might as well promote your app there.

      Your will need an App Website to support your users — you might as well promote your app there too! A good app loading page can drive traffic to your app.

    • Give your app a boost with paid Ads

      Ads are expensive,but they work.

      If you have a budget to spend money on app Ads,there are a lot of options. Mobile App Tracking is an all-in-one SDK that’s popular with games, and Facebook Ads have recently taken off.

    • Cross promote within your other apps

      Your other apps can drive installs to your new app

      Many successful publishers like Rovio,Halfbrick and SuperCell use app cross promotion, and their efforts can put an app to the top of the chars.While not every app might have the same kind of reach,any sort of boose your app can get is helpful.

    • Record an App trailer and video

      Video engages your user more.

      A great video showcasing your app can entice users to try it out. You can place it on your app’s landing page to give a quick overview of your app’s functionality. Take a look at some trailer resouces or get a service to make one for you.

  3. Search Visibility

    Apps that show up often in the App Store get many more download.

    • Optimize keywords for Search Visibility

      App Store Visibility can be difference between success and an app withering out of sight.

      You can’t rely on ads or Apple featureing your app as your distribution strategy. Being visibile in App Store Search is a critical step most app developers forget — avoid these common iTunes Connect keyword mistakes and you will stand above most app.

    • Write a good App Title tagline

      Your app’s title helps with search visibility and conversion.

      While short app titles are good lokking, for titles other than games having a tagline after the app name(ie.Notablity – Take Notes & Annotate PDFs) both help with app store visibility and with explaing to your users what your app is about.

    • Research competing Apps

      Let your competitors do your research for you.

      Knowing what your competitors do well and where they lack is often important for the way you position your own app. Research your competitor’s apps and don’t make the mistakes they do.

    • Internationalize the App’s metadata

      There are a lot of users outside the US.

      While the US market is the biggest,ignoring other markets is often a mistake. Most of the top charting apps are very international and over 75% of their users come outside the US. Plus there is less competition between international apps, so localize your meta-data.

    • Make your App Free!

      Free apps make more profit.

      The majority of top overall grossing apps are all free with in-app-purchases.Making your app free can drive exposure to your app, and typically free apps have more than one monetization stratedy.

  4. Socail Outreach

    Engagind with users and social infuencers helps you maintain momentum.

    • Get friends & family to rate the app five stars

      Fake it until you make it.

      Initial reviews are really important and users are more likely to download an app with a five star rating and stellar reviews. This is especially essential whe you are just releasing a new version update — get it rated highly as quick as possible.

    • Create and maintain Facebook & Twitter page

      Social Pages let your users interact with eachother.

      While large apps need bulletin boards so users can engage with eachother, most apps can get away with just a Facebook and Twitter page.

    • Participate in social media

      Social meida crates buzz.

      Social influencers can be great, and engaging with them via something like Hootsuite or getting them to cover you can give your app a strong presence online. Having an active twitter and facebook page where you converse with fans and reach out to influencers can drive engagement.

    • Get in touch with social influencers,blogs and journalists

      Get influencial people to promote your app.

      Bloggers and social influencers can bring a greate amount of traffic to your app. You can reach out to App Review sites or Tech Blogs to get influencial writers to cover you(just make sure to have an interesting story about your app!)

    • Post on forums, mailing lists,meetup groups

      Utilizing social groups like forums and groups can bring your users.

      About half of your time as an app developer should be spent marketing your app,and reaching out to already existing groups like nice forums,mailing lists or Meetup groups that have the established customer bases to help you reach more users.

  5. Viral Growth

    If each of your users brings a friend your App grows virally.

    • implement share-friendly SDKs

      Sharing is caring.

      SDK like Kamcord let users record videos and engage with other users. Multipalyer turn based SDKs like MGWU let you develop games easier, and platforms like Gamecenter or Openfeint let you have easy scoreboards.

    • prompt users to share via Facebook,Twitter & email

      Virality is best achieved by leveraging social networks.

      Most users are using Facebook or Twitter, so having an easy way for them to tell their friends about a great app lowers the barrier for sharing. If you get each one of your users to bring an extra friend,your audience will grow. Giving your users a reason to share within the app works best.

    • Ask engaged and happy users to review

      Reviews give your app social proof.

      Implement an SDK like [https://github.com/arashpayan/appirater] and ask your engaged and happy users to leave a review. The common way to do this is prompt users after x hours or y opens to answer if they like the app, and send the ones who don’t to yours support email while prompting happy users to leave a review.

    • Figure out monetization

      Free is best!

      The top grossing apps are free apps with in-app-purchases. The barrier to download is almost non-exist when the app is free. If you must take your app paid, you’d better have a good reason(like ethically avoding ads) and feel free to test different price points.

    • Prepare an App update

      You can only change some things with an app update.

      Some things, like adding new keywords, screenshots or changing the title can only be done with an app update.Unless your app includes many change files,Apple is good about keeping the file download size down.Users perfer to download recently updated apps.

  6. App Analytics

    Metrics and insight into how users use your App create success.

    • Track Downloads

      Apple’s tools don’t quite cut it.

      Keeping track of downloads on a per app basis day to day and being able to sparate them by country or region is essencial. Sensor Tower and many others like App Annie,Distimo,etc provide tools to track downloads.

    • Control incoming web-links

      It’s like Bit.ly

      At the very least every incoming link should be going through a url shortener so you can track how many people clicked trought each source. Give your blog mentions and other web-links a specific url, or implement your own and direct users to a correct App Store.

    • Implement in-App Analytics

      Know what your users do within the app.

      Things like Cohort Analysis help you understand how your users behave.Use SDKs like Mixpanel or Amplitude to keep track of usage patterns so you can have a data-driven approach to improving your app.

    • Crash Reporting

      Catch crashed before they turn into bad reviews.

      Crash reporting and performance analytics can help you catch and prevent dreadfully negative reviews. SDKs like Crittercism can help you track crashes and performance problems.

    • Keep track of Search Visibility

      How do users download your apps?

      Tracking search visility within the App Store is something every developer should do — whether you do it via manual entry into a spreadsheet or using tools like [Sensor Tower] you’ll always be better off is you know and improve how users can find your app within the App Store.

Symbolicatecrash

symbolicatecrash是Xcode自带的分析工具,使用crash log文件和.dSYM文件可将crash log中的地址替换为代码位置。

查找symbolicatecrash

查找Xcode安装路径

$ xcode-select -p
/Applications/Xcode.app/Contents/Developer

搜索symbolicatecrash

$ find /Applications/Xcode.app -name "symbolicatecrash"
/Applications/Xcode.app/Contents/SharedFrameworks/DTDeviceKitBase.framework/Versions/A/Resources/symbolicatecrash

解析crash log

将symbolicatecrash、crash log、.dSYM文件拷贝到同一目录,命令行执行

./Symbolicatecrash aa.crash bb.dSYM > cc.log

将解析后的crash log输出到cc.log文件中

注:若有提示”Error: “DEVELOPER_DIR” is not defined”,则设置

$ export DEVELOPER_DIR=/Applications/Xcode.app/Contents/Developer

检查.app文件、.dSYM文件和crash log是否对应的方法

$ dwarfdump --uuid MyApp.app/MyApp
UUID: CC67C4BF-16E7-3512-8E03-10FCFEB5AE5A (armv7) MyApp.app/MyApp
$ dwarfdump --uuid MyApp.app.dSYM/
UUID: CC67C4BF-16E7-3512-8E03-10FCFEB5AE5A (armv7) MyApp.app.dSYM/Contents/Resources/DWARF/MyApp

检查上述两个UUID与crash log中的”slice_uuid”字段是否一致。

参考

CocoaPods

CocoaPods是个针对iOS和OS X应用的类库依赖管理工具。在CocoaPods架构中有三种角色: 类库(Pods), 类库描述仓库(Pod Repo),项目。

下载cocoapods命令行工具

1
2
gem install cocoapods //下载最新版
gem install cocoapods —version 0.33.1  //下载指定版本

如果ruby官方库下载不下来,可以切换成淘宝的源

1
2
3
gem sources --remove https://rubygems.org/
gem sources -a http://ruby.taobao.org/
gem sources -l

Pod Repo库

参考

Hosts

在开发过程中,经常需要修改Hosts访问测试环境,而对于非越狱iOS设备,无法修改设备Host文件/etc/hosts;如果在代码中直接将域名修改为ip地址,存在两个问题:

  1. 破坏了网络代码的结构。
  2. HTTP Header中的”Host”字段也被修改为了ip地址,而后台对”Host”字段有校验,会导致请求出错。

可以通过对NSURLRequestinitWithURL:cachePolicy:timeoutInterval:方法和NSMutableURLRequestsetURL:方法进行 method swizzle来动态的将URL中的host修改为ip,并保持HTTP Header中的”Host”字段不变来解决。

使用NLHosts类来保存host到ip的转换

1
2
3
4
5
interface NLHosts : NSObject

+(NSString*)ipByHost:(NSString*)host;

@end

+ipByHost:方法接收host参数,如果对应host有匹配的ip地址,则返回ip地址,否则返回nil。

NSURLRequestNSMutableURLRequest的method swizzle处理

1
2
3
4
5
6
7
8
@interface NSURLRequest (Swizzle)

@end


@interface NSMutableURLRequest (Swizzle)

@end
1
2
3
4
5
6
7
8
9
10
11
12
13
14
15
16
17
18
19
20
21
22
23
24
25
26
27
28
29
30
31
32
33
34
35
36
37
38
39
40
41
42
43
44
45
46
47
48
49
50
51
52
53
54
55
56
57
58
59
60
61
62
63
64
65
66
67
68
69
70
71
72
73
74
75
76
77
78
79
80
81
82
83
84
85
86
87
88
89
90
91
92
93
94
95
#import "NSURLRequest+Swizzle.h"

#import <objc/runtime.h>
#import "NLHosts.h"

@implementation NSURLRequest (Swizzle)

+(void)load
{
    static dispatch_once_t onceToken;
    dispatch_once(&onceToken, ^{
        Class clazz = NSClassFromString(@"NSURLRequest");
        Method origMethod = class_getInstanceMethod(clazz, @selector(initWithURL:cachePolicy:timeoutInterval:));
        Method newMethod = class_getInstanceMethod(clazz, @selector(initWithNewURL:cachePolicy:timeoutInterval:));

        if (origMethod && newMethod) {
            method_exchangeImplementations(origMethod, newMethod);
        }else{
            //NSLog(@"origMethod:%@ newMethod:%@",origMethod,newMethod);
        }
    });
}

-(id)initWithNewURL:(NSURL *)URL cachePolicy:(NSURLRequestCachePolicy)cachePolicy timeoutInterval:(NSTimeInterval)timeoutInterval
{
    NSString *scheme = URL.scheme;

    if ([scheme compare:@"http" options:NSCaseInsensitiveSearch] == NSOrderedSame || [scheme compare:@"https" options:NSCaseInsensitiveSearch] == NSOrderedSame) {
        NSString *host = URL.host;
        NSString *ip = [NLHosts ipByHost:host];
        if (ip) {
            //NSLog(@"NSURLRequest: host:%@->ip:%@",host,ip);
            NSString *absoluteString = [URL absoluteString];
            NSRange hostRange = [absoluteString rangeOfString:host];
            if (hostRange.location != NSNotFound) {
                absoluteString = [absoluteString stringByReplacingCharactersInRange:hostRange withString:ip];
                NSURL *newURL = [NSURL URLWithString:absoluteString];
                NSMutableURLRequest *newRequest = [[NSMutableURLRequest alloc]initWithURL:newURL cachePolicy:cachePolicy timeoutInterval:timeoutInterval];
                [newRequest setValue:host forHTTPHeaderField:@"Host"];
                self = newRequest;
                return self;
            }
        }
    }
    return [self initWithNewURL:URL cachePolicy:cachePolicy timeoutInterval:timeoutInterval];
}

@end


@implementation NSMutableURLRequest (Swizzle)

+(void)load
{
    static dispatch_once_t onceToken;
    dispatch_once(&onceToken, ^{
        Class clazz = NSClassFromString(@"NSMutableURLRequest");
        Method origMethod = class_getInstanceMethod(clazz, @selector(setURL:));
        Method newMethod = class_getInstanceMethod(clazz, @selector(setNewURL:));

        if (origMethod && newMethod) {
            method_exchangeImplementations(origMethod, newMethod);
        }else{
            NSLog(@"origMethod:%@ newMethod:%@",origMethod,newMethod);
        }
    });
}

-(void)setNewURL:(NSURL *)URL
{
    NSString *scheme = URL.scheme;

    if ([scheme compare:@"http" options:NSCaseInsensitiveSearch] == NSOrderedSame || [scheme compare:@"https" options:NSCaseInsensitiveSearch] == NSOrderedSame) {
        NSString *host = URL.host;
        NSString *ip = [NLHosts ipByHost:host];
        if (ip) {
            //NSLog(@"NSMutableURLRequest setURL: host:%@->ip:%@",host,ip);
            NSString *absoluteString = [URL absoluteString];
            NSRange hostRange = [absoluteString rangeOfString:host];
            if (hostRange.location != NSNotFound) {
                absoluteString = [absoluteString stringByReplacingCharactersInRange:hostRange withString:ip];
                NSURL *newURL = [NSURL URLWithString:absoluteString];
                [self setNewURL:newURL];
                [self setValue:host forHTTPHeaderField:@"Host"];
                return;
            }
        }
    }

    return [self setNewURL:URL];

}


@end

NSURLRequest类的+load方法中将-initWithURL:cachePolicy:timeoutInterval:替换为initWithNewURL:cachePolicy:timeoutInterval:;

initWithNewURL:cachePolicy:timeoutInterval:方法中,如果初始化URL中的host需要转换为ip地址,则使用ip地址替换host生成新的URL,使用新URL生成新的 NSMutableURLRequest,并设置其HTTP Header的”Host”字段为原始值,将此NSMutableURLRequest返回进行后续网络请求。

NSMutableURLRequestNSURLRequest的子类,所以初始化方法在NSURLRequest中进行method swizzle替换后,同样可适用在NSMutableURLRequest。 这样在initWithNewURL:cachePolicy:timeoutInterval:中生成新的NSMutableURLRequest时同样也会调用swizzle过的初始化方法,但此时的 host已经是ip地址了,不需要再次进行转换,会直接调用原方法返回。

NSMutableURLRequest类的-setURL:方法也需要进行类似的处理,具体见代码。

EXCLUDED_SOURCE_FILE_NAMES

在Xcode中可以通过名为EXCLUDED_SOURCE_FILE_NAMES的用户自定义(User-Defined) build setting来配置在某些Configurations下进行构建 不包含的文件。

比如,在Debug环境下会包含用于测试的桩文件,而在发布版本Release环境中不应该包含。

设置方法

在Target的Build Settings中滑到最下面,可看到User-Defined区域。

Build Settings顶部点击+号,选择”Add User-Defined Setting”

在”User-Defined”区域添加名为EXCLUDED_SOURCE_FILE_NAMES设置项,并在Release配置下,添加需要Exlclude的文件名,支持通配符,以空格分隔。

参考

Jenkins

持续集成(CI)介绍

持续集成自动从代码服务器拉取代码,完成自动编译、测试、分发和部署等工作;出现错误时及时通知开发人员,使问题可以立即得到解决,降低项目风险。

Jenkins是一款很流行的持续集成工具,配置简单,结合一些插件和命令行工具可以完成很多工作。

Mac系统同样有一款持续集成工具OS X Server,配置简单,但功能无法扩展,其只能自动完成编译构建、静态代码分享、运行单元测试和打包归档四个工作。

Jenkins安装与配置

安装

  1. 官网下载Mac OS X的安装包
  2. 执行安装程序后会创建jenkins用户,主目录位于/Users/Shared/Jenkins;Jenkins以系统守护进程方式运行,可查看 /Library/LaunchDaemons/org.jenkins-ci.plist配置文件了解详细信息。
  3. Jenkins默认无密码,可使用“sudo passwd jenkins”命令设置密码
  4. 打开Jenkins管理页面 http://localhost:8080/,端口默认为8080,可在管理页面修改。

安全设置

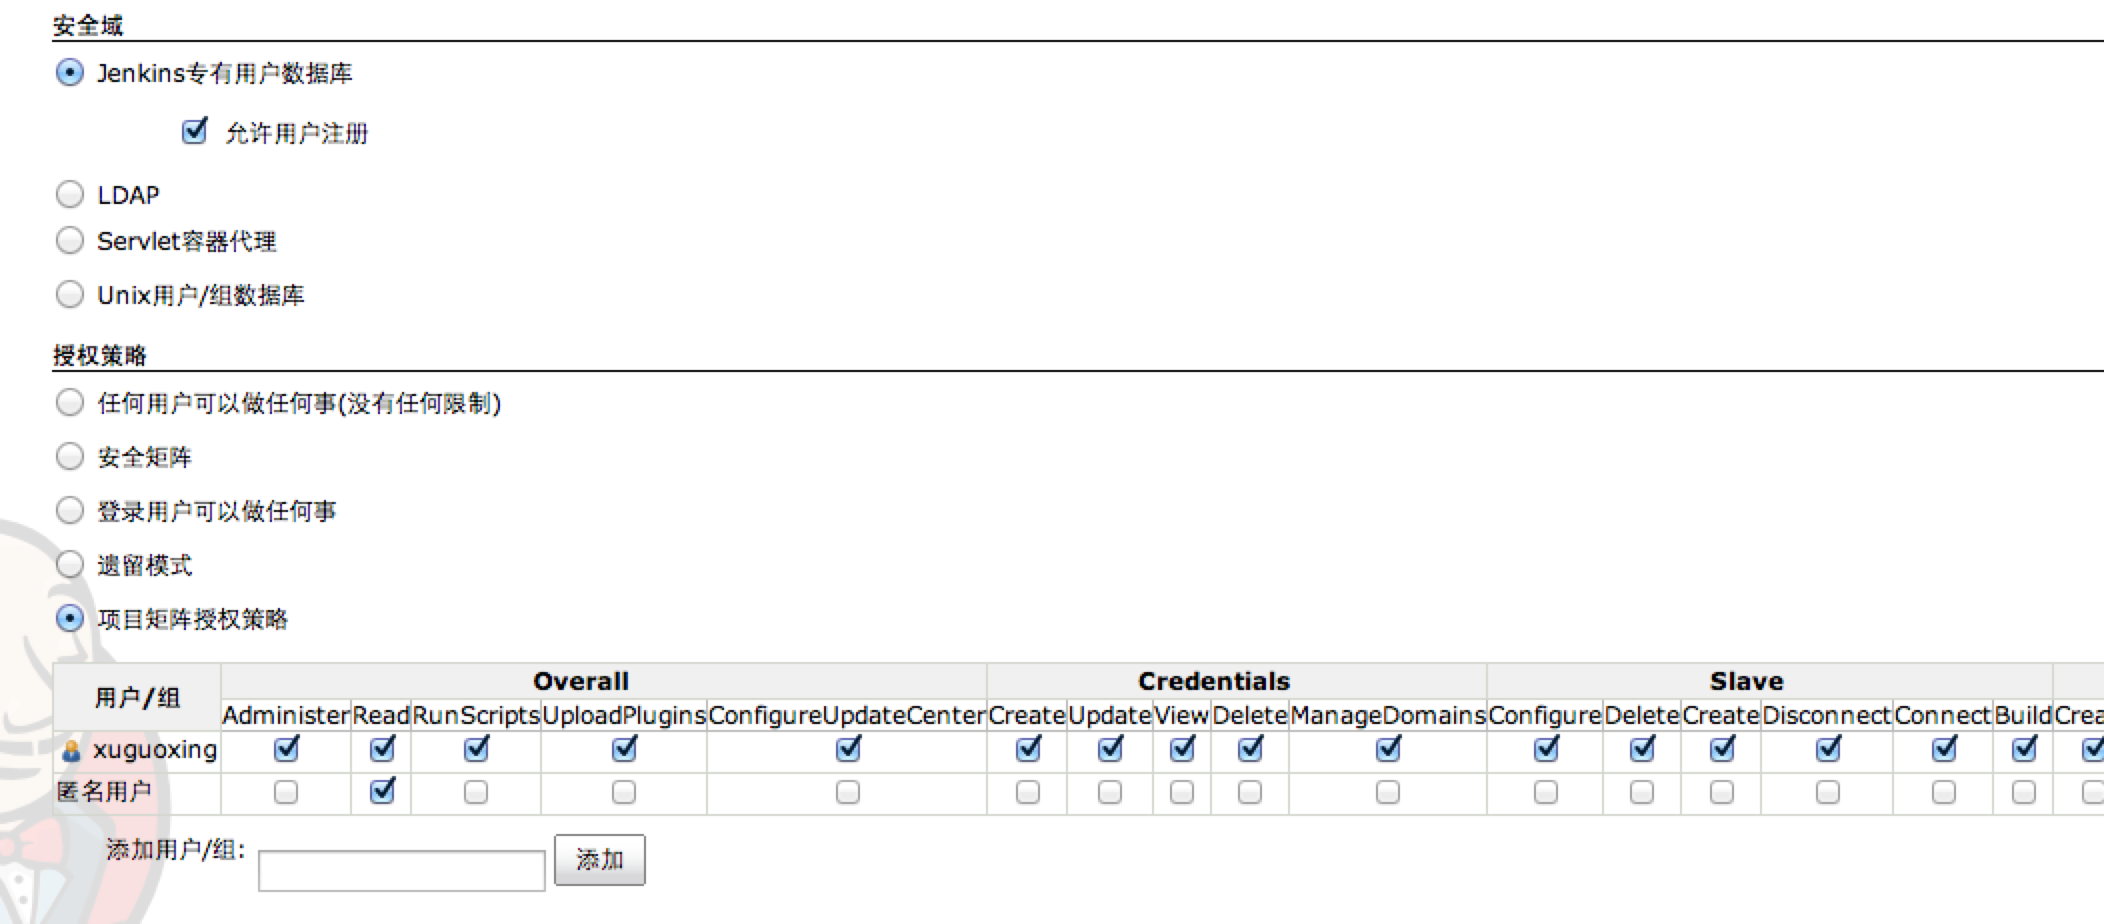
系统管理–>Configure Global Security,默认启用安全没有勾选。

  1. 勾选启用安全
  2. 安全域中选择Jenkins专有项目数据库,并勾选允许用户注册
  3. 授权策略中选择项目矩阵授权策略; 设置匿名用户Read权限;添加一个用户名,给予全部权限(该用户稍后创建)。
  4. 重启Jenkins, http://localhost:8080/restart
  5. 重启后使用Login->create an account使用之前输入的用户名创建账号。

在错误的设置安全域、授权策略时,会无法登录到Jenkins管理页面修改配置,可通过下面的方法修复。

  1. 停止Jenkins(杀进程)
  2. $JENKINS_HOME目录(通常为/Users/Shared/Jenkins/Home)中找到config.xml文件
  3. 打开此文件,将<useSecurity>true</useSecurity>的true修改为false
  4. 删除authorizationStrategysecurityRealm节点
  5. 重启Jenkins,这时会恢复到没有启用安全的情况。

安装插件

系统管理->管理插件中可安装必要的插件。

我们需要安装git插件Git Client PluginGit Server Plugin, Xcode插件Xcode integration

启动、关闭与重启

对于登录用户,可以直接使用Jenkins的管理url。

http://localhost:8080/exit
http://localhost:8080/restart
http://localhost:8080/reload

杀掉jenkins进程

ps -e | grep jenkins
  53 ?? 0:02.51 /usr/bin/java -jar /Applications/Jenkins/jenkins.war
  392 ttys000 0:00.00 grep jenkins
sudo kill 53

使用launchctl

sudo launchctl load /Library/LaunchDaemons/org.jenkins-ci.plist
sudo launchctl unload /Library/LaunchDaemons/org.jenkins-ci.plist

自动化构建

在Jenkins中,任务是以Job为单位的,在管理页面点击新建,输入Item名称, 并选择项目类型为构建一个自由风格的软件项目,点击OK后就进入了Job设置页面。

源码管理

可以根据需要设置从svn或者git获取源码。

对于git需要设置

  • Repository URL: 仓库URL
  • Credentials: 用户名、密码
  • Branches to build:需要构建的分支
  • Additional Behaviours:其它需要执行的git操作,在必要的时候可以设置。

对于svn需要设置

  • Repository URL: 仓库URL
  • Credentials: 用户名、密码
  • Check-out Strategy: check-out的策略,可以直接svn update、在update之前执行svn revert或者获取一份全新的拷贝。

构建触发器

设置构建触发条件,其中Build periodically可以在指定的时间触发构建,在进行每日构建时可以设置,构建时间使用类cron的语法。

也可以不设置触发器,手工触发构建任务。

构建

在构建步骤中可以使用Exeute shell执行任意构建任务,对于iOS项目,我们可以使用Xcode插件简化构建流程。

Xcode

General build settings

指定需要构建的target,不指定会构建所有的targets;在Setting中还有一系列构建的设置。

  • Clean before build? 在build前是否先clean
  • Generate Archive? 是否生成xcarchive文件
  • Configuration 构建使用的配置
  • Pack application and build .ipa? 是否打包ipa文件.

    若选择打包ipa文件,则还需要设置ipa文件名pattern,在名称中可使用:

    • 版本号 ${SHORT_VERSION},
    • build号 ${VERSION}
    • 构建日期 ${BUILD_DATE},日期格式为yyyy.MM.dd

    比如可设置为MyApp_${SHORT_VERSION}_build${VERSION}_${BUILD_DATE},那么生成的文件名格式为MyApp_v1.0_build10_2014.05.17.ipa

  • Output directory 相对于build目录的ipa文件生成目录。

Code signing & OS X keychain options

代码签名及KeyChain设置

  • Code Signing Identity 用于签名的开发者标识,可以在keychain中查看,名称格式为”iPhone Developer: your_name (XXXXXXX)”

  • Unlock Keychain? 解锁keychain,设置Keychain pathKeychain passwordKeychain path设置为 ${HOME}/Library/Keychains/login.keychain

注:Jenkins以jenkins用户运行,其用户目录在/Users/Shared/Jenkins,若Jenkins在开发电脑上安装,实际上Xcode编译所需要的 keychain、Provisioning Profiles等信息都在原登录用户下,自动构建时就会报代码签名错误。可通过以下步骤解决:

  1. 在”Keychain Access”应用中将开发者证书从”login”拷贝到”sysmtem”。

    在”Keychain Access”中的login tab中,右键点击证书“iPhone Developer: your_name (XXXXXXX)”,选择“拷贝xxxx”;然后在system tab中右键点击,选择”粘贴2项”。

  2. 将主用户目录下的KeyChains目录拷贝到jenkins用户目录下

/Users/YourName/Library/Keychains–>/Users/Shared/Jenkins/Library/Keychains

  1. 将主用户目录下的MobileDevice目录拷贝到jenkins用户目录下,MobileDevice中有DevicesProvisioning Profiles两个子目录。

/Users/YourName/Library/MobileDevice–>/Users/Shared/Jenkins/Library/MobileDevice

Execute shell

可以在构建步骤中的任意位置执行脚本,比如在Xcode插件之前执行脚本设置必要的编译环境,执行单元测试,在Xcode插件打包ipa文件后, 将文件上传到后台服务部署分发等。

比如,可增加”Execute shell”将打包文件上传后台服务器。

1
2
3
4
5
6
7
8
#!/bin/sh

buildDate=`date +%Y.%m.%d`
version=`/usr/libexec/PlistBuddy -c "Print CFBundleVersion" ./MyApp-Info.plist`
shortVersion=`/usr/libexec/PlistBuddy -c "Print CFBundleShortVersionString" "./MyApp-Info.plist"`
ipaFileName="MyApp_v"${shortVersion}"_build"${version}"_"${buildDate}".ipa"

curl --form "reporter=@./build/Release-iphoneos/"${ipaFileName} http://host/cgi-bin/up.cgi

构建后操作

增加设置构建完成后进行的步骤,可发布测试报告、邮件通知等。

参考

OCMock

在面向对象的系统中,所有的对象之间都有一定的联系。在单元测试中,当需要对某一个对象进行测试时,其可能依赖其他对象的返回值或者调用 其他对象的某些方法。其依赖的对象有可能行为不确定或者很难触发(各种错误场景)或者该对象还不存在。这种情况下需要使用Mock Object来模拟 依赖对象的行为,返回特定的值、实现特定的方法,来保证对测试对象的单元测试能有个可预期的结果来判断单元测试是否通过。

OCMock

OCMock是个mock object的Objective-C实现,其使用Objective-C的动态特性可以快速创建mock object,并且使用Objective-C方法调用的语法来定义expectationsstubs

OCMock提供了三种mock功能

  • stub(桩) :对特定的方法返回预定义的值。
  • dynamic mock(动态Mock):验证某个方法是否被调用。
  • partial mock(部分Mock):重写已存在对象的方法。

添加OCMock框架

  1. 下载页面下载预编译的dmg文件,在其中的iOS目录下包含静态库libOCMock.aOCMock头文件目录。 也可从GitHub https://github.com/erikdoe/ocmock下载源码自行编译。

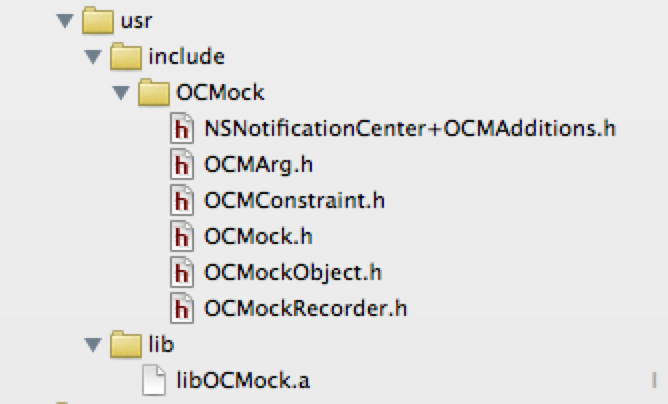
  2. 在单元测试目录下,建立如下目录结构,并添加到项目中。

  • 在测试Target的Build Phases->Link Binary With Libraries中应该会自动包含libOCMock.a库,若没有,需手动添加一下。

  • 头文件搜索路径设置,在测试Target的Build Settings->Search Paths->Header Search Paths中添加路径$(PROJECT_DIR)/NeteaseLotteryTests/usr/include

  • link设置,测试Target的Build Settings->Linking->Other Linker Flags设置-Objc,-force_load $(PROJECT_DIR)/NeteaseLotteryTests/usr/lib/libOCMock.a

创建Mock对象

OCMockObject类有几个工厂方法创建mock对象

  • +mockForClass: 基于给定类创建mock对象
  • +mockForProtocol: 基于给定协议创建mock对象
  • +niceMockForClass: 基于给定类创建”nice”mock对象
  • +niceMockForProtocol: 基于给定协议创建”nice”mock对象
  • +partialMockForObject: 基于给定对象创建”partical”mock对象
  • +observerMock: 创建通知观察者(notification observer)mock对象

三种mock对象类型

  1. 普通mock对象

    使用+mockForClass:+mockForProtocol:创建的mock对象在接收到未定义的方法调用时产生NSException异常。

  2. nick mock对象

    使用+niceMockForClass:+niceMockForProtocol:创建的mock对象在接收到未定义的方法调用时简单忽略。

  3. partical mock对象

    partical mock对象基于一个真实对象,而不是一个类或协议,其将一个已存在对象转换成mock,可重写其中的方法。

Mock使用方法

OCMock Tutorials

stub

1
2
3
id jalopy = [OCMock mockForClass[Car class]];
[[[jalopy stub] andReturn:@"75kph"] goFaster:[OCMArg any] units:@"kph"];
[[[[jalopy stub] classMethod] andReturn:@"expired"] checkWarrany];

expect

1
2
3
4
5
id niceMockThing = [OCMock niceMockForClass[Thing class]];
[[niceMockThing expect] greeting:@"hello"];

// verify the method was called as expected
[niceMocking verify];

参数(OCMArg)

  • +any 任意参数
  • +anyPointer 任意指针参数
  • +isNil nil参数
  • +isNotNil 非nil参数
  • +isNotEqual: 不与某个对象相等的参数
  • +checkWithSelector:onObject: 使用指定的target/action对检查通过的参数
  • +checkWithBlock: 使用block检查通过的参数

返回值

使用-expect-stub返回的对象可使用下列方法设置返回值或者执行某种行为

  • -andReturn: 返回指定对象
  • -andReturnValue: 返回指定值(NSValue)
  • -andThrow: 抛出指定异常
  • -andPost: post指定通知
  • -andCall:onObject: 在指定object上调用指定selector
  • -andDo: 调用指定block

可以指定-andDo:对block回调进行模拟,假设有这样的一个方法

1
2
- (void)downloadWeatherDataForZip:(NSString *)zip
              callback:(void (^)(NSDictionary *response))callback;

则使用以下方法进行模拟

1
2
3
4
5
6
7
8
9
10
11
12
13
14
// 1. stub using OCMock andDo: operator.

[[[groupModelMock stub] andDo:^(NSInvocation *invoke) {
        //2. declare a block with same signature
        void (^weatherStubResponse)(NSDictionary *dict);

        //3. link argument 3 with with our block callback
        [invoke getArgument:&weatherStubResponse atIndex:3];

        //4. invoke block with pre-defined input
        NSDictionary *testResponse = @{@"high": 43 , @"low": 12};
        weatherStubResponse(groupMemberMock);

    }]downloadWeatherDataForZip@"80304" callback:[OCMArg any] ];

andDo中的invoke参数即模拟的方法调用本身,使用getArgument:atIndex:可读取方法调用的参数, 对于本例,第四个参数((索引3))即为callback参数(前两个参数分别为self_cmd),执行callback实参,传递预定义的参数即可。

依赖注入(Dependency Injection)

依赖注入是一种软件设计模式,使某一模块所依赖的其他模块或服务,在该模块创建时以注入的方式引入。

在单元测试中需要使用此模式设计类,以方便使用Mock对象来替换待测试对象所依赖的其他对象。

举例:

某类内部需要使用NSNotificationCenter,原始做法是直接使用NSNotificationCenter defaultCenter

1
2
3
4
5
6
@implementation ExampleObject : NSObject
-(void)postNotification
{
    [[NSNotificationCenter defaultCenter] postNotificationName:@"SomethingCompletedNotification" object:self userInfo:userInfo];
}
@end

在做单元测试时,我们只需要知道ExampleObject对象的-postNotification方法确实调用了NSNotificationCenterpostNotificationName:方法, 并不需要实际去发送通知,实际发送通知会引起其他模块的反应,不是此单元测试的目的。

所以我们需要使用NSNotificationCenter的mock对象来代替真实的NSNotificationCenter对象;而上面的方法无法进行mock,需要进行重构。

1
2
3
4
5
6
7
8
9
10
11
12
13
14
15
16
17
18
19
20
21
22
23
24
25
26
27
28
29
30
31
32
33
34
35
36
37
38

@interface ExampleObject : NSObject


@property (nonatomic, readonly) NSNotificationCenter *notificationCenter;

- (instancetype)initWithNotificationCenter:(NSNotificationCenter *)center;
    //...
@end

@interface BNRCodeHostFetcher ()

@property (nonatomic, strong, readwrite) NSNotificationCenter *notificationCenter;

@end

@implementation ExampleObject : NSObject

- (instancetype)initWithNotificationCenter:(NSNotificationCenter *)center
{
  self = [super init];
  if (self)
  {
      self.notificationCenter = center;
  }
  return self;
}

- (instancetype)init
{
    return [self initWithNotificationCenter:[NSNotificationCenter defaultCenter]];
}

-(void)postNotification
{
    [[self notificationCenter] postNotificationName:@"SomethingCompletedNotification" object:self userInfo:userInfo];
}
@end

这样,在正常使用时我们可以直接使用-init方法,会传递系统的NSNotificationCenter对象;在做单元测试时,可以使用-initWithNotificationCenter: 方法传递mock的NSNotificationCenter对象作为参数。

1
2
3
4
5
6
id notificationCenter = [OCMock mockForClass[NSNotificationCenter class]];
[[notificationCenter expect] postNotificationName:[OCMArg any] object:[OCMArg any] userInfo:[OCMArg any]];

ExampleObject *exampleObject = [[ExampleObject alloc]initWithNotificationCenter:notificationCenter];
[exampleObject postNotification];
[notificationCenter verify];

参考