XCTest是Xcode5引入的单元测试框架,替换了之前的OCUnit。XCTest中的测试用例类都继承自XCTestCase类,断言前缀为XCT。
项目中引入XCTest框架
创建新项目
使用Xcode5新建项目,会自动创建名为[ProjectName]Tests的Target,
自动生成[ProjectName]Tests目录,且包含一个测试失败的单元测试文件[ProjectName]Tests.m。
老项目中引入
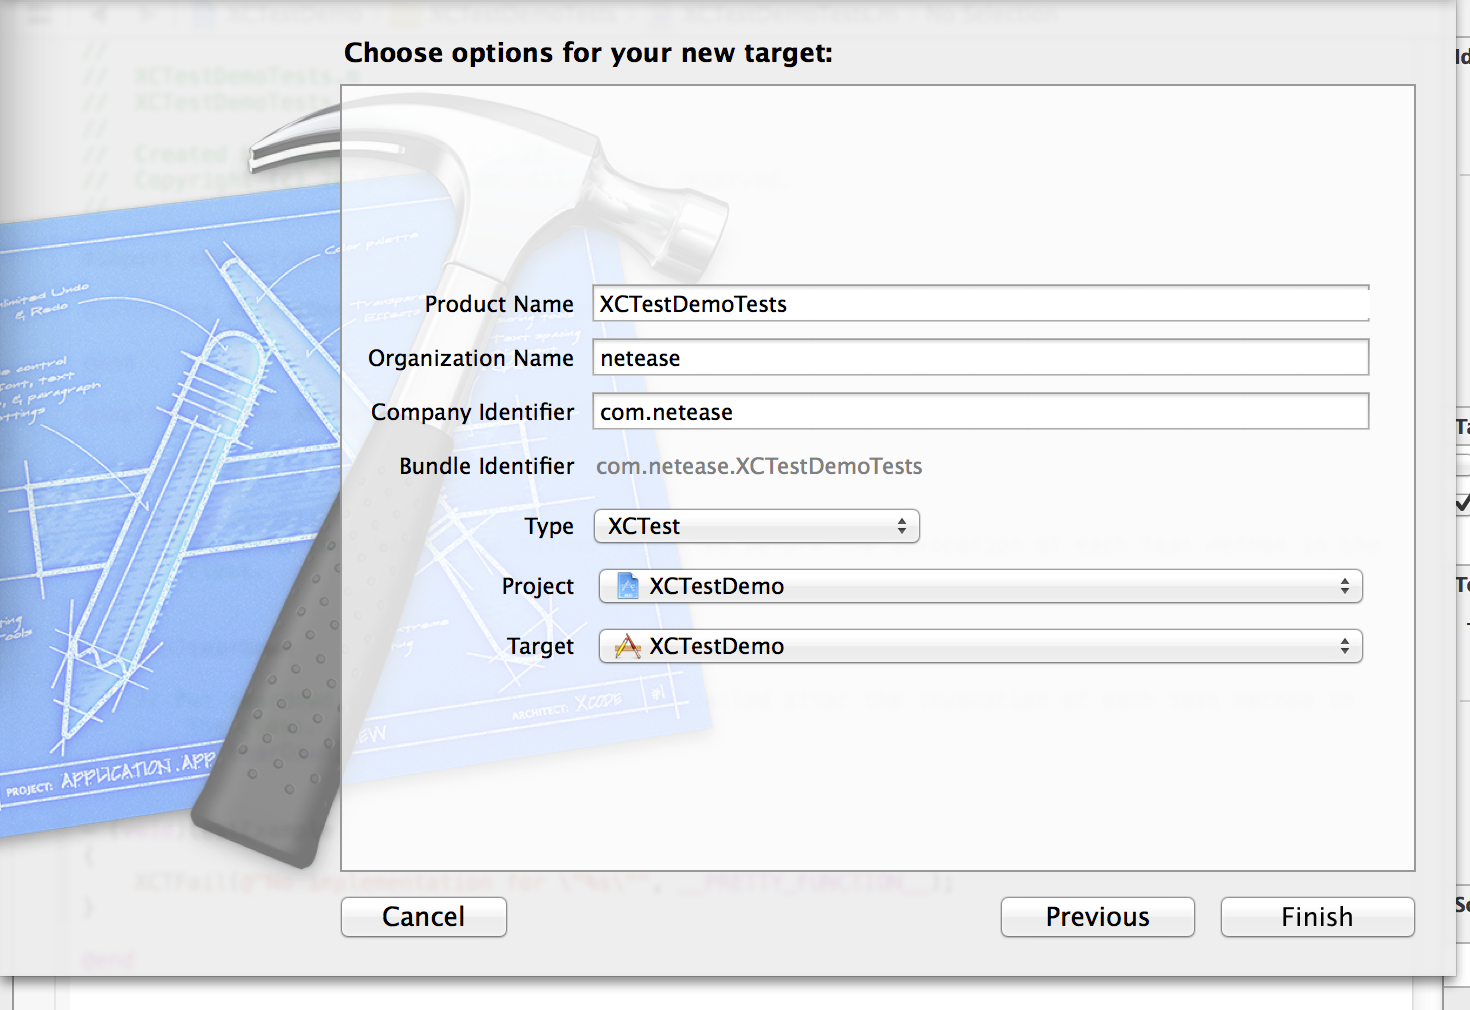
在Xcode中选择菜单File->New->Target...,在弹出框中选择iOS->Other->Cocoa Touch Unit Testing Bundle,在弹出的设置页面中
可根据需要修改,其中Product Name中的默认值为[ProjectName] Tests,中间包含一空格,推荐将空格去掉;其他项保持原状即可。
注:
* XCTest框架在运行时自动注入(Inject) app的target,访问其中的符号信息(symbols),
所以在XCTest Target的Compile Sources中只需要包含测试用例文件,不需要包含待测试的源文件。
* 若运行单元测试时有找不到符号的提示,检查下app Target Build Settings中的Symbols hidden by default,应该设为NO。
运行单元测试
- 菜单
Product->Test或者Command+U可运行全部测试用例。 - 在Xcode5的导航区有
Test Navigator,在其中可选择运行整个bundle的测试方法、运行某个测试类或运行某一个测试方法。 - 使用
xcodebuild test命令运行。
1
| |
注: XCTest只能在iOS7以上的模拟器或设备中运行,所以在使用方法1、2时,Xcode中的指定的运行设备需为7.0以上的;而使用xcodebuild test
命令运行时需指定destination参数,选择7.0以上的模拟器或真实设备运行。否则会有错误提示:
“Library not loaded: /Developer/Library/Frameworks/XCTest.framework/XCTest”
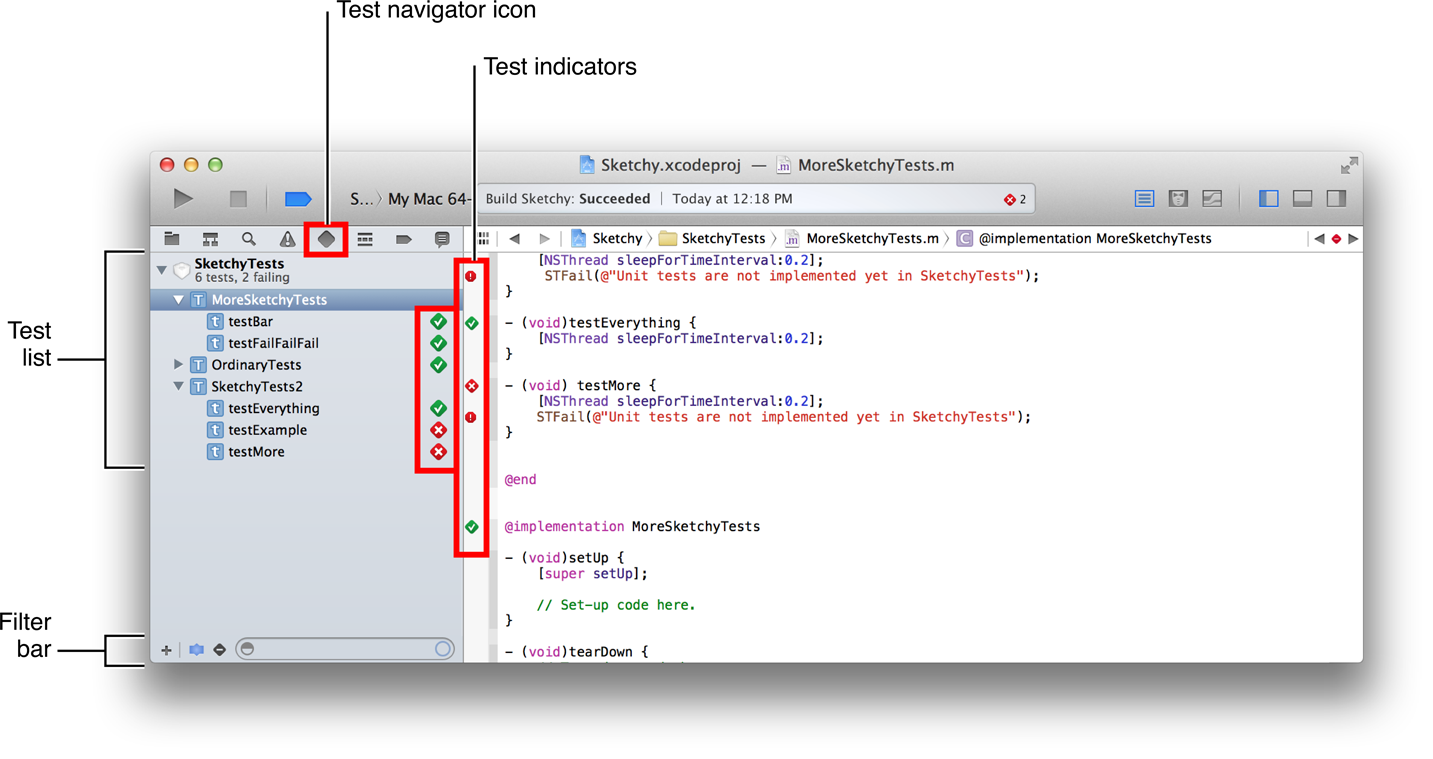
执行完测试用例后,执行通过的测试用例左侧会有绿色对勾图标,执行失败的测试用例左侧会有红色x图标,且执行失败的行会红色高亮显示。
XCTestCase类结构
一个测试用例文件如下:
1 2 3 4 5 6 7 8 9 10 11 12 13 14 15 16 17 18 19 20 21 22 23 24 25 26 27 28 29 30 31 32 33 34 35 36 37 38 39 40 41 42 43 44 45 46 | |
在XCTestCase类中包含类方法+ (void)setUp、+ (void)tearDown,实例方法- (void)setUp、- (void)tearDown以及多个测试方法。
这些方法的执行顺序为
+ (void)setUp- (void)setUp- (void)testExample1- (void)tearDown- (void)setUp- (void)testExample2- (void)tearDown+ (void)tearDown
即setup类方法会在类创建的调用一次,类销毁的时候调用tearDown类方法,在每个测试方法执行之前调用setUp实例方法,测试方法执行之后调用
tearDown实例方法。
断言
XCTest支持的断言有:
- XCTFail (format…)
- XCTAssertNil (a1, format…)
- XCTAssertNotNil (a1, format…)
- XCTAssert (a1, format…)
- XCTAssertTrue (a1, format…)
- XCTAssertFalse (a1, format…)
- XCTAssertEqualObjects (a1, a2, format…)
- XCTAssertEquals (a1, a2, format…)
- XCTAssertEqualsWithAccuracy (a1, a2, accuracy, format…)
- XCTAssertThrows (expression, format…)
- XCTAssertThrowsSpecific (expression, specificException, format…)
- XCTAssertThrowsSpecificNamed (expression, specificException, exceptionName, format…)
- XCTAssertNoThrow (expression, format…)
- XCTAssertNoThrowSpecific (expression, specificException, format…)
- XCTAssertNoThrowSpecificNamed (expression, specificExcepton, exceptionName, format…)
具体可见XCTestAssertions.h文件
异步单元测试
正常情况下,单元测试方法执行完毕后立即返回,若测试的是异步任务,此时没有拿到异步任务的返回结果,测试就终止了。
测试异步任务时,需要注意两个方法:
- 单元测试方法在异步任务完成前不能返回。
- 在Cocoa中需要使用
run loop来处理网络和定时器,这样异步任务才能完成。
解决方案:
- 在调用异步任务后,使用
CFRunLoopRun()启用run loop一直等待,且run loop去处理网络和定时器以完成异步任务。 - 在异步任务完成后,使用
CFRunLoopStop(CFRunLoopGetCurrent())终止当前的run loop,以结束单元测试方法。
CFRunLoopRun
The current thread’s run loop runs in the default mode (see “Default Run Loop Mode”) until the run loop is stopped with CFRunLoopStop or all the sources and timers are removed from the default run loop mode.
Run loops can be run recursively. You can call CFRunLoopRun from within any run loop callout and create nested run loop activations on the current thread’s call stack.
CFRunLoopStop
This function forces rl to stop running and return control to the function that called CFRunLoopRun or CFRunLoopRunInMode for the current run loop activation. If the run loop is nested with a callout from one activation starting another activation running, only the innermost activation is exited.
1 2 3 4 5 6 7 8 | |
github上有两个开源库使用NSRunLoop对此方法进行了扩展,增加了超时等机制。