在面向对象的系统中,所有的对象之间都有一定的联系。在单元测试中,当需要对某一个对象进行测试时,其可能依赖其他对象的返回值或者调用
其他对象的某些方法。其依赖的对象有可能行为不确定或者很难触发(各种错误场景)或者该对象还不存在。这种情况下需要使用Mock Object来模拟
依赖对象的行为,返回特定的值、实现特定的方法,来保证对测试对象的单元测试能有个可预期的结果来判断单元测试是否通过。
OCMock
OCMock是个mock object的Objective-C实现,其使用Objective-C的动态特性可以快速创建mock object,并且使用Objective-C方法调用的语法来定义expectations和stubs。
OCMock提供了三种mock功能
stub(桩) :对特定的方法返回预定义的值。dynamic mock(动态Mock):验证某个方法是否被调用。partial mock(部分Mock):重写已存在对象的方法。
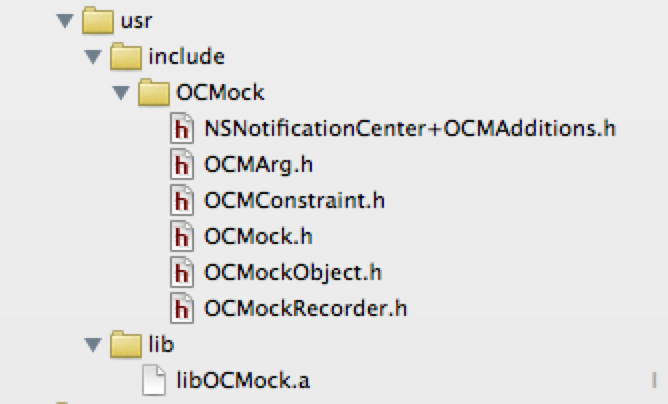
添加OCMock框架
在下载页面下载预编译的dmg文件,在其中的iOS目录下包含静态库
libOCMock.a和OCMock头文件目录。 也可从GitHub https://github.com/erikdoe/ocmock下载源码自行编译。在单元测试目录下,建立如下目录结构,并添加到项目中。
在测试Target的
Build Phases->Link Binary With Libraries中应该会自动包含libOCMock.a库,若没有,需手动添加一下。头文件搜索路径设置,在测试Target的
Build Settings->Search Paths->Header Search Paths中添加路径$(PROJECT_DIR)/NeteaseLotteryTests/usr/includelink设置,测试Target的
Build Settings->Linking->Other Linker Flags设置-Objc,-force_load $(PROJECT_DIR)/NeteaseLotteryTests/usr/lib/libOCMock.a
创建Mock对象
OCMockObject类有几个工厂方法创建mock对象
+mockForClass:基于给定类创建mock对象+mockForProtocol:基于给定协议创建mock对象+niceMockForClass:基于给定类创建”nice”mock对象+niceMockForProtocol:基于给定协议创建”nice”mock对象+partialMockForObject:基于给定对象创建”partical”mock对象+observerMock:创建通知观察者(notification observer)mock对象
三种mock对象类型
普通mock对象
使用
+mockForClass:、+mockForProtocol:创建的mock对象在接收到未定义的方法调用时产生NSException异常。nick mock对象
使用
+niceMockForClass:、+niceMockForProtocol:创建的mock对象在接收到未定义的方法调用时简单忽略。partical mock对象
partical mock对象基于一个真实对象,而不是一个类或协议,其将一个已存在对象转换成mock,可重写其中的方法。
Mock使用方法
stub
1 2 3 | |
expect
1 2 3 4 5 | |
参数(OCMArg)
+any任意参数+anyPointer任意指针参数+isNilnil参数+isNotNil非nil参数+isNotEqual:不与某个对象相等的参数+checkWithSelector:onObject:使用指定的target/action对检查通过的参数+checkWithBlock:使用block检查通过的参数
返回值
使用-expect或-stub返回的对象可使用下列方法设置返回值或者执行某种行为
-andReturn:返回指定对象-andReturnValue:返回指定值(NSValue)-andThrow:抛出指定异常-andPost:post指定通知-andCall:onObject:在指定object上调用指定selector-andDo:调用指定block
可以指定-andDo:对block回调进行模拟,假设有这样的一个方法
1 2 | |
则使用以下方法进行模拟
1 2 3 4 5 6 7 8 9 10 11 12 13 14 | |
andDo中的invoke参数即模拟的方法调用本身,使用getArgument:atIndex:可读取方法调用的参数,
对于本例,第四个参数((索引3))即为callback参数(前两个参数分别为self和_cmd),执行callback实参,传递预定义的参数即可。
依赖注入(Dependency Injection)
依赖注入是一种软件设计模式,使某一模块所依赖的其他模块或服务,在该模块创建时以注入的方式引入。
在单元测试中需要使用此模式设计类,以方便使用Mock对象来替换待测试对象所依赖的其他对象。
举例:
某类内部需要使用NSNotificationCenter,原始做法是直接使用NSNotificationCenter defaultCenter。
1 2 3 4 5 6 | |
在做单元测试时,我们只需要知道ExampleObject对象的-postNotification方法确实调用了NSNotificationCenter的postNotificationName:方法,
并不需要实际去发送通知,实际发送通知会引起其他模块的反应,不是此单元测试的目的。
所以我们需要使用NSNotificationCenter的mock对象来代替真实的NSNotificationCenter对象;而上面的方法无法进行mock,需要进行重构。
1 2 3 4 5 6 7 8 9 10 11 12 13 14 15 16 17 18 19 20 21 22 23 24 25 26 27 28 29 30 31 32 33 34 35 36 37 38 | |
这样,在正常使用时我们可以直接使用-init方法,会传递系统的NSNotificationCenter对象;在做单元测试时,可以使用-initWithNotificationCenter:
方法传递mock的NSNotificationCenter对象作为参数。
1 2 3 4 5 6 | |